
Backcountry Skiing and Snowboarding in 5 Steps
Posted by Dan Goodman on 14th Nov 2019
Skiing and snowboarding untouched powder in the backcountry can be a fickle mistress. Fresh tracks seem to be around every corner and if you ask social media, it’s nothing but a party in the white room, all-day, every day. But as with all good things, there’s a catch, and in this case, the catch is lurking under the snow in the form of a giant, angry avalanche dragon, just waiting to ruin your fun. Most backcountry skiers, including myself, have made mistakes and counted ourselves lucky to have the chance to learn from them which is why it’s important to take the following steps into consideration before you decide to head out-of-bounds.
1. Get the Knowledge
Avalanches aren’t unpredictable natural disasters that only exist in the news, and avalanche safety should always be the primary concern of every excursion in the backcountry. Triggering a slide, by accident or on purpose, can have direct effects not only on you or your party but on other skiers or bystanders as well. That’s why it’s important to start by learning about snow safety before you ever step into avalanche terrain by reading books, taking avalanche safety courses, and learning how to interpret and understand your local avalanche report.
2. Get the Right Gear
When it comes to equipment, there’s a lot of it, and it can feel overwhelming at first trying to sort out what you need versus what you want. Having the right gear can make the difference between a struggle to the summit and a saunter, but there’s more to backcountry ski gear than the latest tech ski boots or the newest avalanche airbag. More than anything, it’s important to not only have the right gear but to know how to use it. Ultimately, the most important tools you have in the backcountry are a solid avalanche beacon, probe, shovel, and touring partner as well as a method of travel that you understand and have the skill set to use.
3.Get the Lingo
As with most outdoor activities, skiers have their own way of talking to each other that might sound like nonsense to your average person. Some of what you’ll hear in the backcountry you may be familiar with already from the resort and some will be new to you. One thing’s for sure though, you’ll want to head out with a good vocabulary if you want to avoid looking like a jerry.
4. Get a Partner
Skiing solo can be fun, but doing so in the backcountry inevitably increases your risk. No matter how much knowledge you have or how good your gear is, if there’s no one to dig you out of a slide, then you have to make extra certain to ski in safe terrain. Fortunately, stacking the deck in this case is easy, all you have to do is rope one of your friends into backcountry skiing with you.
5. Get on the Skintrack
Once you’ve learned best travel practices and have all of your gear lined up, make a plan and get out there. Part of the learning process is simply getting outside and exploring new places with your ski partners. Decide where you want to go, how you want to get there, communicate with your partners, and slap those skins on!

1. Get the Knowledge
If you’re lucky enough to find yourself skiing in Utah, you may already know about the Utah Avalanche Center which offers a wealth of resources for avalanche safety including daily forecasts all winter long, selected routes to backcountry pow stashes, and information on how to find the nearest avalanche safety courses. Outside of Utah, there are plenty of other options around the country which can be found on avalanche.org, to offer the best local resources near you.
Next, take some time to read about how avalanches work and behave. Classic reads include Bruce Tremper’s Staying Alive in Avalanche Terrain and Snow Sense: A Guide to Evaluating Snow Avalanche Hazard by Doug Fesler and Jill A. Fredston. Another valuable tool to use is the
Know Before You Go series, an interactive, online program built to help skiers and riders stay safe when they’re out-of-bounds. These will give you a solid base to form a better understanding of the way avalanches work and will help immensely once you take your recreational American Institute for Avalanche Research and Education (AIARE) course, which will teach you invaluable skills including how to navigate terrain, understand how weather affects the snowpack, how to perform snowpack stability tests, and what to do in the event of an avalanche.
2. Get the Right Gear
There’s enough gear involved in backcountry travel to fill your entire house, and if you aren’t careful it will do just that, so we’ll keep it to the essentials broken out into two categories: Avalanche Safety Equipment and Essential Snow Travel Gear.
Avalanche Safety Equipment
Beacons
Whether you call it a beacon, transceiver, or the thing that makes that beeping noise, this is an absolutely critical piece of equipment for the backcountry traveler. Yes, it is expensive, and yes, it can save your life in the event of an avalanche. Beacons come in many different shapes and sizes, but most of today’s beacons rely on a 3-antenna design to pick up the pulsed radio signal of a buried beacon and translate it into a digital display and audible noise. If you or a member of your party are buried in an avalanche, an avalanche beacon is the most reliable tool you have to coordinate a rescue.
When it comes to deciding which beacon is the right one for you, it’s important to be realistic about what features will make your life easier during a rescue and what might be more confusing to you. In reality, any functioning beacon will do, as long as you know how to use it and have regularly practiced with it to get a feel for how it works.
Top Avalanche Beacon Recommendations: Pieps DSP Sport Beacon, Black Diamond Recon BT Beacon, and the BCA Tracker 3 Beacon
![]()
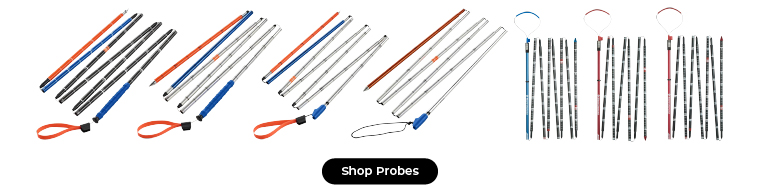
Probes
Once you locate a buried beacon’s signal, you need a way to pinpoint exactly where the avalanche victim is located, that’s where an avalanche probe comes in. By probing the area defined by your beacon search, you can easily and accurately determine the position of a buried victim, which means less time digging and less of a chance that you’ll start digging in the wrong place.
Avalanche probes aren’t only useful for rescue scenarios either, they can be invaluable tools for measuring snowpack depth, performing snowpit tests, and annoying your friends from a distance when they’re trying to put their iced-over splitboards back together.
Probes tend to be about a 1.5-feet long when collapsed and run anywhere from 8.5 to 10.5 feet in length when extended. The right size for you will depend mostly on how deep a typical snowpack is for your area, as well as what will fit in your pack.
Top Avalanche Probe Recommendations: Black Diamond Quickdraw Probe Tour 280, Ortovox ALU 240 PFA Probe, and the Mammut Probe 320 Fast Lock
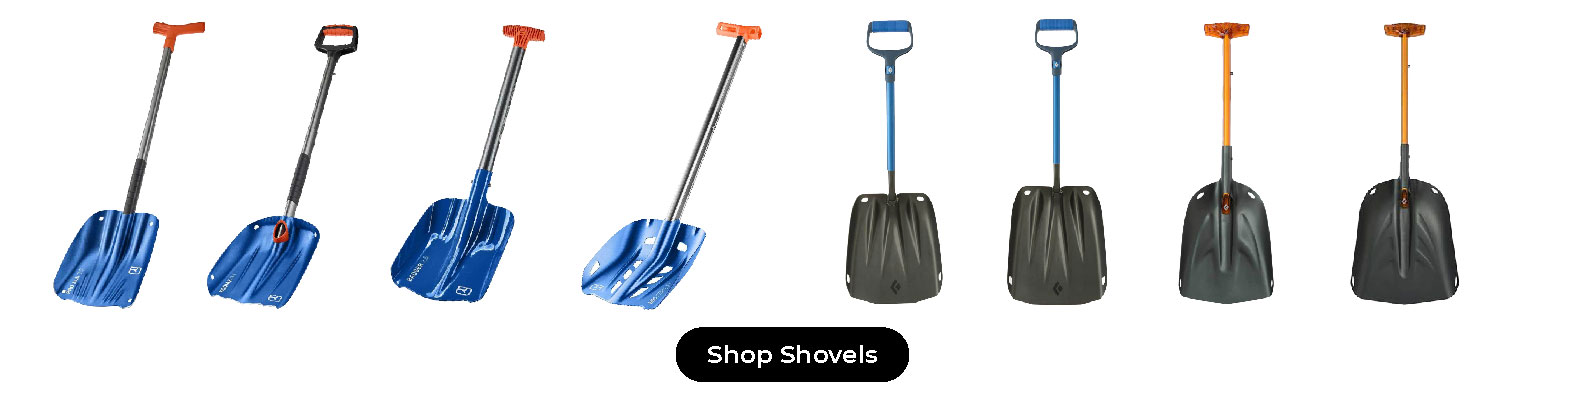
Shovels
A good shovel is like a good touring partner: it helps you determine when a slope is unsafe to ski, it does all of the digging for you, and it doesn’t hold you back on the skin track. While space and weight in your pack are always important considerations, the best question to ask yourself is, “How helpful will this be when I’m trying to dig my friend out of the snow and it’s set up like concrete?” Needless to say, shovels that move a lot of snow, are made of high-quality materials and are easy to put together are what you should be looking for.
Similar to probes, shovels are great for performing snowpack stability tests, digging pits, and creating the occasional snow fort when you’re waiting for a whiteout to pass.
Top Avalanche Shovel Recommendations: Ortovox Kodiak Shovel, Black Diamond Evac 9 Shovel, and the Mammut Alugator Pro Shovel
Avalanche Airbag Backpacks
Here’s the first item on our list that is not an avalanche must-have, but more and more backcountry travelers are investing in airbags. The principle behind the airbag is that by pulling a trigger and instantaneously gaining an extra 150 to 200-liters of volume on your back, your chances of staying above the snow during an avalanche increase dramatically, as do your chances of survival. Some studies suggest that airbags can increase survival rates by up to 27% when used correctly. Airbags are by no means a solution to the avalanche problem and don’t even guarantee survival, but they are another tool you can add to your kit to stack the odds in your favor.
Top Avalanche Airbag Recommendations: Black Diamond Jetforce Tour Avalanche Airbag Pack, Arc’teryx Voltaire 30L Airbag Backpack, and the Backcountry Access Float 32 Airbag Backpack

Essential Snow Travel Gear
All of this safety gear will be of little use if you can’t get out into avalanche terrain in the first place, making it worthwhile to think about the skills you have and the skills you want to develop in terms of snow travel. Mountaineers will have a completely different set of required equipment for a day of glacier travel than a typical backcountry skier will have when seeking out powder stashes at their local ski hill. Different backcountry pursuits will lead to different gear checklists, so here are some of the most essential items you’ll need to get out there.
Backcountry Skis
Any ski can be used in the backcountry when paired with the right binding, but as with most outdoor equipment, there are skis built specifically for backcountry travel. Often, these skis are designed with lightweight materials to make your life on the skin track a little less miserable, but keep in mind that lighter skis also mean less power and more chatter in chunder and hardpack. When picking a touring ski, take into consideration the number of days you plan to ski the backcountry versus the resort, as well as the type of snow common to your area.
Top Backcountry Ski Recommendations: Black Diamond Helio 95 Ski, DPS Wailer T106 Ski, and the Voile V6 Ski
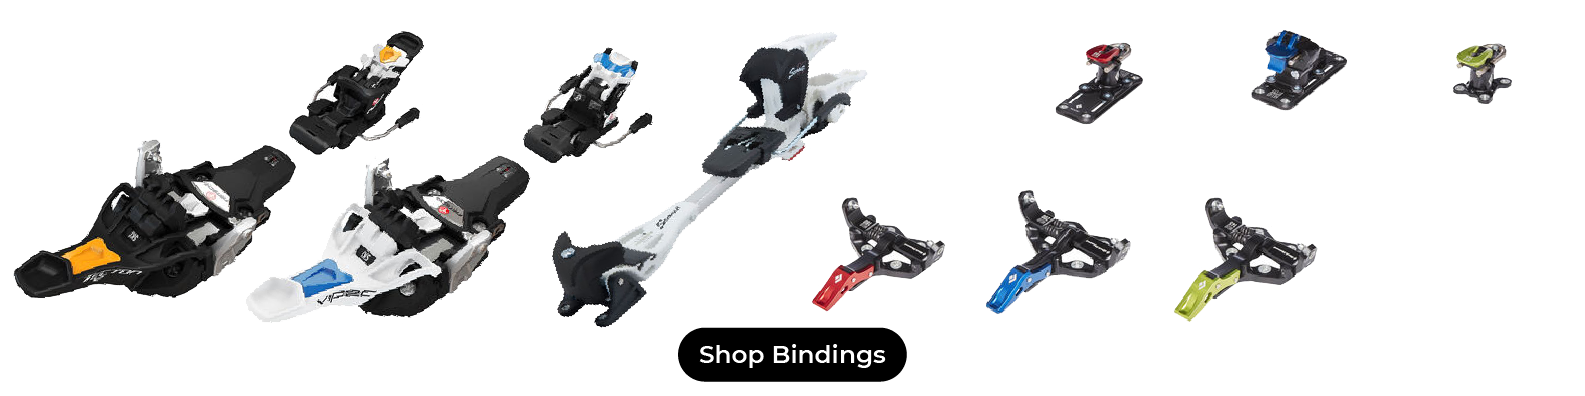
Alpine Touring (AT) Bindings
While any ski can be used for touring purposes, bindings are a different story. Touring bindings are different from alpine bindings in that they allow the heel to be released from the bindings, making it possible to walk uphill. Once at the top, the bindings can be switched into ski-mode, locking your heel back into place, and you can ski down normally.
AT bindings come in many forms, but the standard options are tech bindings, frame bindings, and telemark bindings (the only binding type where the skier’s heel is never locked down). Tech bindings are the lightest option, but also tend to be the most expensive and so are best for the dedicated backcountry skier. Frame bindings are ideal for skiers who want the ability to head out for a morning tour but will spend most of their time in the resort. Finally, telemark bindings are great for both backcountry skiing and skiing the resort, but if you don’t already know how to telemark ski, it might be easiest to stick with one of the first two options.
Top AT Binding Recommendations: Black Diamond Helio 200 Ski Bindings, Black Diamond Fritschi Tecton 12 Ski Bindings, and the Marker Kingpin 13 AT Binding
Backcountry Boots
Similar to skis, any boot can be used for touring, but heading out for a long tour in your normal alpine boots will result in more hot spots and blisters than you could ever have imagined. Alpine touring ski boots have shells designed with a walk-mode, allowing the upper part of the shell to pivot separately from the bottom, offering a more natural stride while skinning. Most AT boots are compatible with tech bindings but be aware that different boots are built to be compatible with different binding types, so make sure to check compatibility before you head out for a day on the snow.
Top Touring Boot Recommendations: Scarpa Maestrale RS Alpine Touring Ski Boots, Scarpa Maestrale XT Alpine Touring Ski Boots, Tecnica Zero G Tour Scout Alpine Touring Boot, and the Atomic Hawx Ultra Xtd 120 Alpine Touring Boot
Splitboards
For snowboarders, travel in the backcountry is limited to either hiking in with snowshoes on your feet and your snowboard on your back or buying a splitboard, which allows you to split your board down the middle for the hike up and easily assembles back into a snowboard for the ride down. Most snowboarders eventually opt for the splitboard option as it is a more efficient tool for backcountry travel and requires you to carry less gear.
Top Splitboard Recommendations: Jones Solution Splitboard, Arbor Bryan Iguchi Pro Splitboard, and the Burton Flight Attendant Splitboard
Splitboarding Bindings
With a completely new board comes a different set of requirements for your bindings. Splitboard bindings have with different attachments, called touring brackets that allow your bindings to be set up like skis in touring mode, and then reverted to a traditional snowboarding stance once your board is back together.
Top Splitboarding Binding Recommendations: Voile Speed Rail Splitboard Bindings, Burton Hitchhiker Splitboard Bindings, and the Spark R&D Surge Splitboard Bindings
Splitboarding Boots
Most snowboarders stick with their standard boots for touring, but backcountry specific snowboard boots are being made today. These models don’t feature anything absolutely essential for the purposes of touring but are oftentimes lighter in weight and more breathable than their downhill oriented cousins.
Top Splitboarding Boots Recommendations: Burton Tourist Snowboard Boots, Jones MTB Snowboard Boots, and the Salomon Synapse Snowboard Boots
Climbing Skins
Once you’ve sorted out the perfect skis/splitboard, you’ll need skins to give you enough traction to effectively walk uphill on snow and ice. With glue on one side and synthetic fibers on the other, skins stick to the base of your skis/board and let you glide up the hill without slipping and sliding everywhere. Most skins are made to be cut down to match your ski width, so a good general rule is to buy skins that are as wide as the widest point on your ski. You can then trim them down to fit the rest of your ski accordingly.
Top Climbing Skins Recommendations: Pomoca Climb Pro S-Glide Climbing Skins, Black Diamond Ascension Nylon STS Climbing Skin, and the Voile Splitboard Skin + Tail Clip
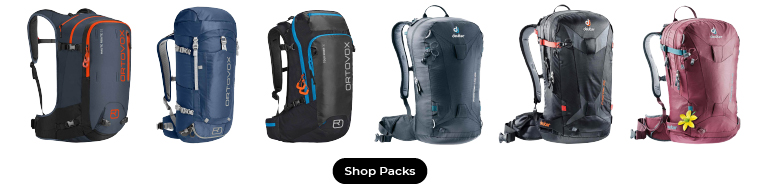
Backpacks
While avalanche airbag packs aren’t an essential item by any means, some sort of day pack is. Any backpack that can fit your shovel, probe, and layers will do, but if you begin to tour on a regular basis you’ll likely want to invest in a pack built for the task. Many backpacks designed for backcountry skiing come with handy features like a front pouch designed to store your snow safety tools as well as external straps for carrying your skis/splitboard on your pack.
Top Touring Backpack Recommendations: Ortovox Haute Route 32 Backpack, Mammut Nirvana 35L Backpack, Osprey Kamber 32L Backpack
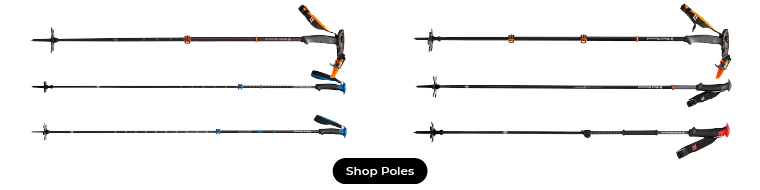
Ski Poles
Whether skiing or snowboarding, you’ll want a pair of poles in your hands on the uphill. The first time you forget them at home by accident, you’ll realize what a blessing they are. Fixed-length poles will get the job done, but adjustable poles are often preferred to account for changing terrain and snow types. Adjustable poles are also easier for snowboarders to stash away in their packs for the ride down, and there are even poles made for splitboarding that fold up into three pieces for storage purposes.
Top Ski Pole Recommendations: Black Diamond Razor Carbon Ski Poles,Black Diamond Whippet Ski Pole, and the Black Diamond Traverse Pro Ski Poles
3. Get the Lingo
It’s important to pick up on the language of the backcountry so you can communicate with the regulars out there. Anyone spending enough time on the snow will start to sound like they are speaking a different language, and you want to make sure that you know at least a few key phrases to blend in. You wouldn’t go to Spain without at least learning at least a few basic Spanish phrases would you? The same goes for skiing the backcountry.
Below are a few words and phrases you’ll want to familiarize yourself with:
Après
How you recover from a day of skiing/snowboarding, often over drinks and snacks at the lodge, bar, or a ski partner’s house.
Blower Pow
Lightweight powder that curls overhead when you’re skiing that results in snow getting in your face, also known as a face shot.
Bed Surface
The surface on which an avalanche fractures and slides. This can be a weak layer of snow or on the ground itself.
Breaking Trail
Being the first person on the skin track since the last snowfall. A highly envied position as whoever breaks trail knows that whatever line they want to ski will also be fresh, untouched snow.
Cold Smoke
Powder so dry and light that it feels more like smoke than powder when it lofts through the air.
Crown
The top fracture surface of an avalanche that runs 90° perpendicular to the bed surface.
Dawn Patrol
Starting your tour well before the sun comes up to make the most of cold snow as well as to make a few pre-work powder turns.
Depth Hoar
Large faceted snow crystals near the ground that form because of a temperature gradient in the snowpack. Considered a persistent weak layer within the snow.
Faceted Snow
Snow that forms due to temperature gradients in the snowpack, tends to bond poorly, and often feels sugary to the touch.
Farming
Taking tight turns in closely spaced lines to make the most of every inch of fresh snow.
Flank
The side of an avalanche. Two flanks running 90° perpendicular to the bed surface are connected to the crown of each avalanche.
Getting Pitted
Making turns in deep powder often resulting in the skier entering the ‘White Room’.
Graupel
Snow formed by highly convective storms and shaped like small styrofoam balls. Graupel tends to roll off of cliffs and to collect at the bottom of them which can cause areas of instability.
Hot Lap
Taking another quick lap after your first descent of the day. Usually done after a longer approach to a slope that can be ascended in a relatively short amount of time.
Loud Powder
Powdery surface snow that makes a characteristically loud sound when you ski it and is often comprised of surface hoar or faceted snow. Can become a persistent weak layer if buried.
Powder Hound
That friend of yours that gets so excited and hungry for powder that he/she takes off ahead of the group and always wants to drop first.
Skinner
Also known as the skin track, this is the common trail that leads to certain ski slopes in the backcountry.
Surface Hoar
The winter equivalent to frost. Feather-like crystals that form on the snow surface during calm, cool conditions. Can become a persistent weak layer if buried.
Terrain Trap
Areas of increased danger where even a small avalanche can be life-threatening. Common terrain traps include cliffs, valleys, gullies, and groves of trees at the base of a slope.
Track
The path that an avalanche follows as it runs downhill.
White Room
When you make a turn that sends up so much snow that you momentarily lose all sense of orientation and ability to discern any features in front of you.
4. Get a Partner
Whether it’s a ski partner you’ve known for years or someone you recently met who is as interested in slogging up hills as you are, the importance of a good ski partner or two is undeniable for many reasons. First, a partner can help you make decisions about the relative safety of a slope before you decide to ski it, and getting a second opinion on whether or not a ski slope is about to rip out from underneath your skis or snowboard should always be a welcome piece of information. Secondly, if the slope does happen to fracture while you’re skiing it, you want to be able to count on the fact that someone has a chance of finding you and digging you out. Finally, a good partner can help you learn along the way. There’s a lot to understand when it comes to backcountry skiing and avalanche safety, and learning it all is nearly impossible. Listening to what your partner has to say is just as important as learning the basics yourself.
All of this revolves around having a ski partner who has also done their homework. Your partner should have taken an avalanche safety course, read about snowpack stability, purchased the right gear, and learned how to use it before you ever hit the skin track together. Similar to not knowing how your own safety equipment works, if your partner doesn’t know how to perform a basic beacon search, it essentially becomes useless.
When it comes to ski partners in avalanche terrain, a good rule of thumb is to keep it to a group of four or less. There are many reasons behind this, but the general idea is that larger parties tend to lack good communication, allow group dynamics to get in the way of sound decision-making processes, and are more likely to be a hindrance in an avalanche search.
5. Get on the Skintrack
Skiing and snowboarding out-of-bounds can be a great way to stay fit and ski fresh snow in the winter, but the backcountry is not a place to take lightly. Avalanches can and do happen every year, and it’s important to be prepared for the worst if you’re going to head out there. This article is meant to help you get a head start on the touring season and is not meant to replace proper education and training, a necessity for all backcountry travelers.
Here are a few things to think about when you head out for any tour:
- You are responsible for the safety of yourself, your party, and others when you’re out there, keep that in mind with every slope you decide to ski.
- Check the avalanche forecast every day for your area if you have one. Avalanche centers are full of professionals who offer you free information about snowpack stability on a regular basis. Take advantage of it and use it in your decision-making process. If you don’t have a local forecast, take your education further, learn how to read the snowpack, pay attention to the weather and understand how it affects the snow on a short-term and a long-term scale.
- Practice with your equipment regularly. Avalanche safety equipment only works if you know how to use it. Grab a few friends, run some beacon practice drills, and simulate a full-blown rescue. You’ll thank yourself later if you ever find yourself in a real emergency scenario.
- Make a plan, then make a backup plan. This goes for everything in the backcountry from the slope you want to ski to what you’ll do if the slope begins to fracture under your feet. Having a plan gives you the ability to act when you need to instead of thinking about what to do next.
Now that you understand the basics of backcountry travel, you’ve got the gear to look the part, found a knowledgeable partner, and you’re even talking like a skier, it’s time for the fun part, actually shredding fresh lines. If you’ve taken an avalanche safety course and bought the proper equipment, you’re ahead of the vast majority of backcountry travelers. All that’s left is for you to get out there and enjoy a few face shots for the rest of us. It’s a tough job, but someone’s got to do it.
About Campman
Campman is an outdoor retail store located in Salt Lake City, Utah that specializes in gear and equipment for camping, skiing, backpacking, climbing, and everything in between. We understand that the difference between a bad memory and the adventure of a lifetime can come down to the gear you take with you when you head outdoors, and we want our customers to have the best experiences possible. When it comes to getting outside, we get it, and we’ll get you the gear you need to get there.
Questions? Feel free to contact us by phone at (801) 999-8117 or by email at sales@campman.com.
Share on: